Card Flourishes & Sleights
How to Shoot Playing Cards
Learn a striking card flourish that sends cards springing out from the deck. Follow the finger positions, build the tension gradually and practise until you can control the release.
⭐ Difficulty
Beginner to Intermediate
🃏 What You Need
A standard deck of playing cards
⏱ Practice Time
Short, regular practice sessions
The Effect
You hold a normal deck of playing cards out in front of you. Cards then shoot out from the deck and spin through the air. As your handling improves, you can begin to guide the direction and distance of the flight.
This is a card flourish rather than a self-working trick: the visual impact comes from your finger position, timing and control of the card's release.
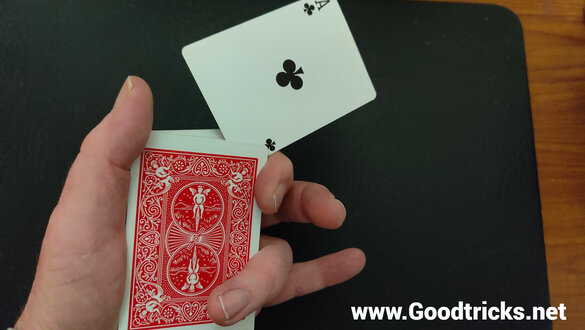
What You Need
One ordinary deck
Start with a standard deck of playing cards. Use a deck that is in reasonable condition and not so slippery that you struggle to control a single card.
How to Shoot a Card from the Deck
The move is relatively simple to understand, but it takes repetition to develop a clean and reliable release. Work through the positions slowly before trying to shoot the card with speed.

Start in Mechanics Grip
Hold the deck in mechanics grip. Place your thumb along one side, your first finger at the top of the deck and your remaining three fingers along the opposite side.
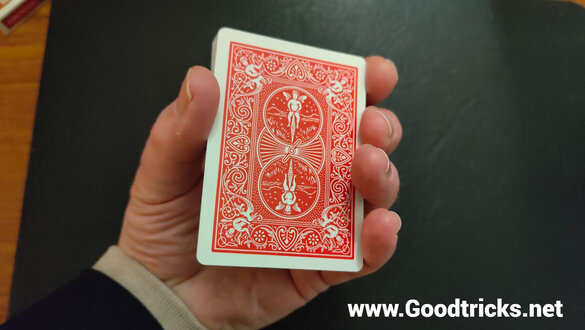
Move Your First Finger
Move your first finger from the top of the deck to the side, as shown in the photograph. Keep a secure but relaxed hold on the pack.
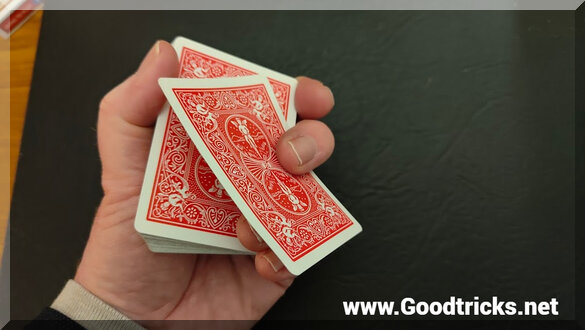
Slide the Top Card Outward
Use your middle finger to pull and slide the top card towards the side of the pack at an upward angle, following the position shown in the image.
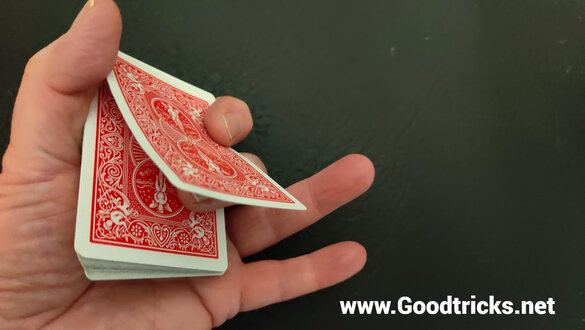
Create the Spring Tension
Swap the middle finger so it is underneath the top card, with your first finger on top holding it down. Push upward with the middle finger to create spring tension.
Release the Card
As the tension increases, the card will spring free and fly away from the deck. It may take a few attempts to find the right amount of pressure and finger movement.
Watch the Demonstration
The video below, by 52 Kards, gives a more detailed explanation and visual demonstration of the move.
Why the Move Works
The card is held briefly between your fingers while the middle finger applies upward pressure underneath it. This bends the card and builds spring tension. When the card is no longer held in place, that tension releases and sends it away from the deck.
The exact amount of pressure and the angle of the card affect how it travels. Develop consistency before trying to increase the distance.
Performance Tips
Build control before distance
Start with a gentle release and concentrate on sending the card in a predictable direction. The original tutorial suggests a slight forward movement of the wrist as the card snaps free to help increase its flight distance.
- Practise the finger positions slowly before adding speed.
- Keep your grip secure without squeezing the whole deck too tightly.
- Use a clear, uncluttered practice area.
- Once the release is consistent, experiment gradually with direction.
Practice Safely
A released playing card can travel quickly. Practise away from faces, eyes, pets, fragile objects and anyone who is not expecting a card to fly towards them. Never aim at a spectator.
Common Mistakes
- Trying to shoot too hard: focus on the finger position and clean release first.
- Incorrect finger placement: return to the mechanics-grip starting position and rebuild the move one position at a time.
- Rushing the sequence: practise each change of finger position slowly until it feels natural.
- Expecting a long flight immediately: consistency and direction are better early goals than maximum distance.
Practice Plan
- Rehearse the mechanics grip and first-finger movement.
- Practise sliding the top card outward without releasing it.
- Add the middle-finger position and build gentle tension.
- Practise the release in a safe, open area.
- Watch the demonstration again and compare your finger positions.